

PHONE
(909) 988-3400

ADDRESS
541 E. Main St.
Ontario, CA 91761
Hello and welcome to the 24th issue of the Lion Premium Grills Newsletter. In this issue we will examine, step-by-step, the addition of a beautiful outdoor kitchen to a renovated backyard set-up. It’s easy to see just how much of a difference the addition of our grill and island make when added to any backyard. We do not hesitate to state that our products are without a doubt peerless and first in their class in terms of not only appearance but also in their functionality. We also take a look at some simple ways to take your grilling experience to entirely new levels. We would like to thank all of you for visiting our site and our supporting our products. We hope you enjoy your stay and this latest issue of our newsletter!
Lion Premium Grills Newsletter – No. 24, September 2015
ARCHIVE#1 - October 2013 #2 - November 2013#3 - December 2013#4 - January 2014#5 - February 2014#6 - March 2014#7 - April 2014#8 - May 2014#9 - June 2014#10 - July 2014#11 - August 2014#12 - September 2014#13 - October 2014#14 - November 2014#15 - December 2014#16 - January 2015#17 - February 2015#18 - March 2015#19 - April 2015#20 - May 2015#21 - June 2015#22 - July 2015#23 - August 2015
Purchasing a brand new outdoor kitchen / BBQ island is exciting in and of itself; actually watching it being assembled and added to what was previously an empty backyard patio is even better! It’s amazing to see, step-by-step, just the difference that the addition of one of our luxurious BBQ islands can make — functionally and visually — to any outdoor set-up. What was once an empty space is immediately transformed into a conversation piece; a place where guests and family can gather around and talk, relax, and enjoy both drink and food. It adds an extra dimension to any backyard. Below you’ll be able to see the process of adding a 3-piece BBQ island. Enjoy!
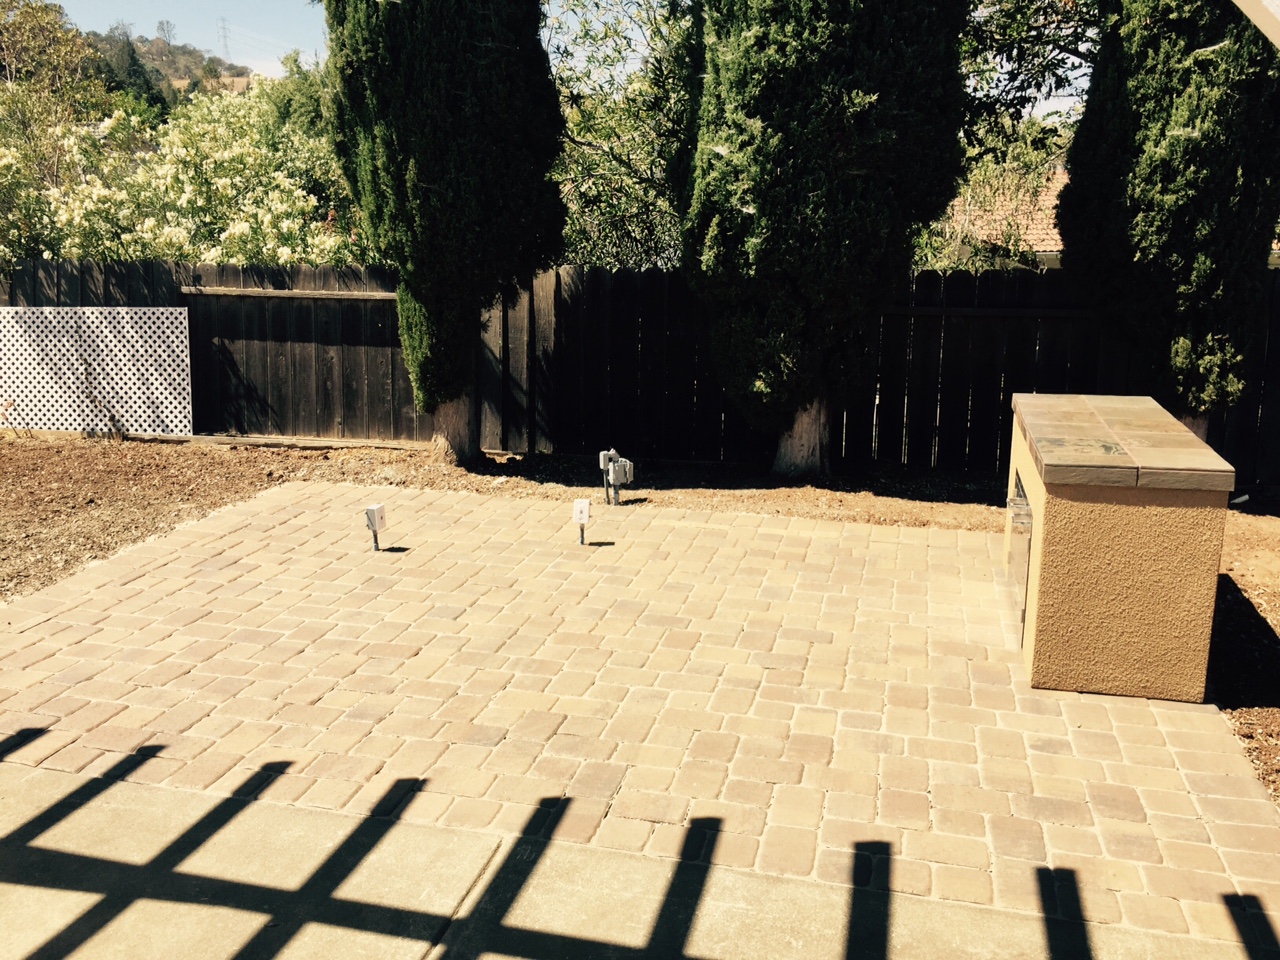 Here’s the first image for this particular backyard. You can see the proper electrical boxes and gas line set and ready to go for a streamlined installation experience. At this point, the first piece of this 3-piece BBQ island is moved onto the patio and set into position. This is the smallest piece and allows for some seating area if need be. In this case it will be primarily used for storage. You can see our exquisite Lion Double Doors that are dual-lined and constructed from high grade 304 grade stainless steel. The difference in quality will be immediate (thickness, sense of weight, the shimmering appearance of the steel are all markers that our doors are impeccably made). The other benefit of the 304 grade stainless steel is that it is rust resistant (which can tend to be a problem with lower grades of stainless steel).
The island countertop is made of porcelain tile and comes from the esteemed Franciscan Slate Collection. In this instance it is the Woodland Verde color scheme. These tiles are extremely durable and can hold up to 280 lbs. of pressure. The blended color patterns are subtle and stunning to look at in terms of detail and overall appearance. The base of the island is comprised of our stucco finish; not only is the stucco we use weather resistant it also adds a beautiful texture that makes the island “pop” visually speaking.
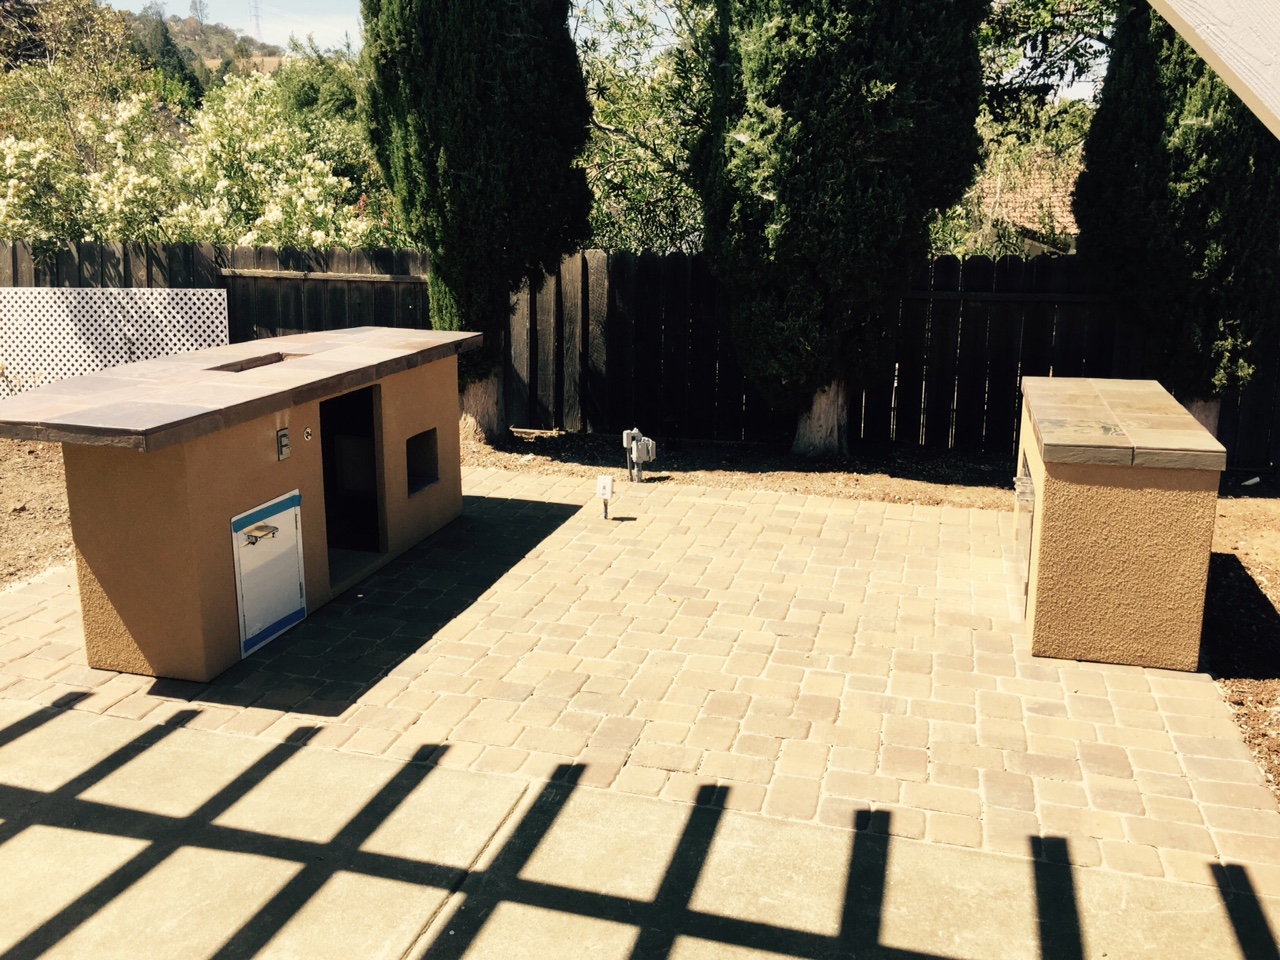
The drastic difference that adding an outdoor kitchen to one’s backyard is becoming more and more apparent as the additional segments are pieced together and added. In this instance, we have the second piece moved into place directly across from the first, smaller island segment. This piece will use electricity so it is placed over one of the electrical boxes already installed on this particular patio. You can see that this segment is larger and has an extended countertop overhang; this area functions as a perfect seating area where friends and family can congregate, eat, and talk. Directly in the center of the counter there is a rectangular firepit area which further enhances the versatility of this island. Visible on the island itself are a multitude of additional features – There is a GFCI outlet, a built-in bottle opener, and a stainless steel access door. It’s getting there, but it’s still not complete as you may be able to notice that there is an unfilled cut-out for our eco-friendly outdoor refrigerator.
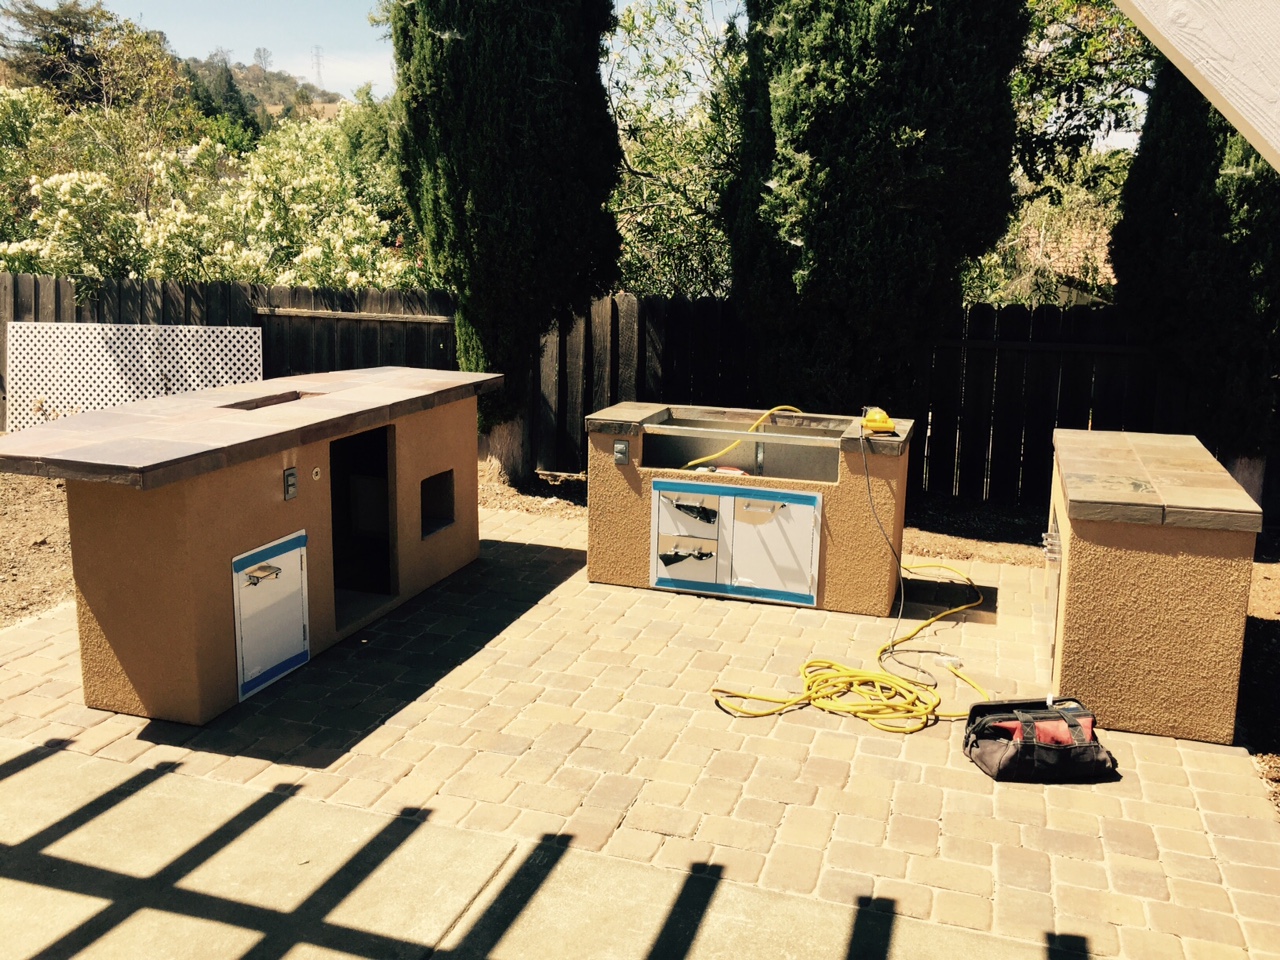
The final segment is now moved into position and prepped for final set-up. As you can see, this is the piece of the outdoor kitchen that will house the most vital component of any outdoor kitchen — the BBQ grill! Cutouts are prepared so that the island can be placed directly over the gas line and final electrical box and so that all of these components can be safely housed within the base of the island itself. This segment also has a large combination access door and double drawer directly on the front of the island. This is constructed fro 304 grade stainless steel just like the rest of our stainless steel products providing quality, weather resistance, durability, and aesthetic value. All of our accessories during installation come with a protective plastic seal so that there is no damage, scratches, etc. inflicted while we move, place, and install our BBQ islands/outdoor kitchens.
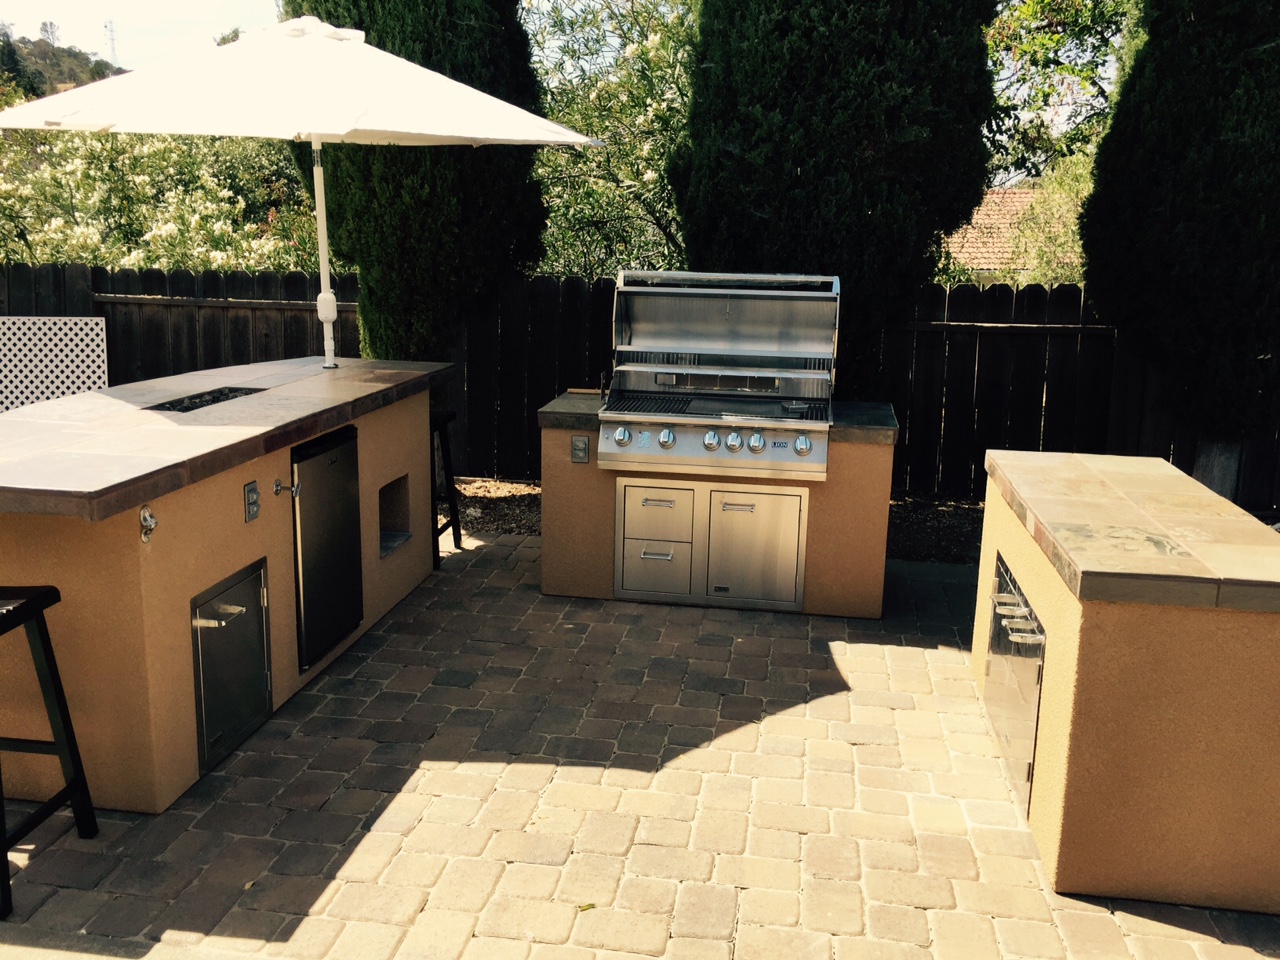
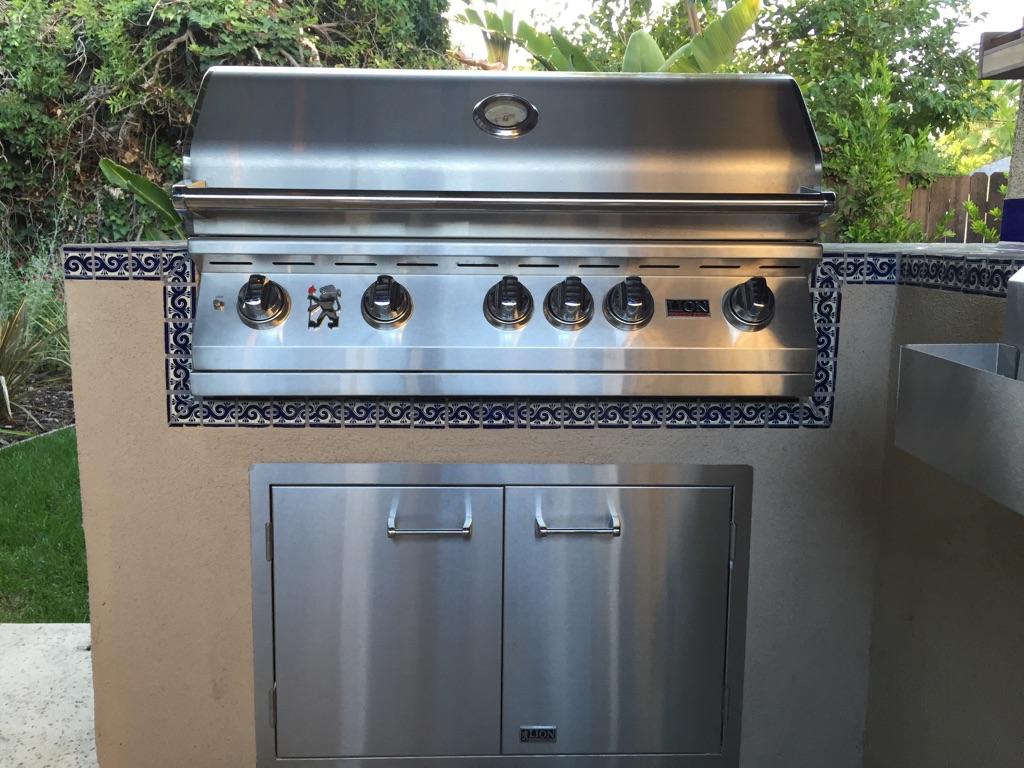
The images directly above and below showcase the most exciting aspect of any installation — the final result! Everything has been placed into proper position, assembled, and prepped for usage. The end product is stunning to say the least. What was once a barren patio is now a fully functional outdoor kitchen with all of the trimmings. The centerpiece now has our luxury 40″ L9000 gas built-in BBQ installed. The L9000 outputs an incredible 90,000 BTUs over 5 burners, features an infrared backburner, has roughly 1,030 sq. ft. of total grilling space, and is constructed from high grade 304 stainless steel. Not only is the grill itself beautiful but it is magnificently built and is rust and weather resistant to boot. It is undoubtedly the crown jewel of our product line-up. Our beautiful Lion refrigerator is also set into place. Our fridge is environmentally friendly, is constructed from stainless steel and uses R-600a as a refrigerant which is not only amazing at cutting down emissions but also drastically reduces electricity usage (cutting down on bills is always a plus). The protective seal has also been removed from all of the stainless steel accessories so you can see the finished product in its full glory.
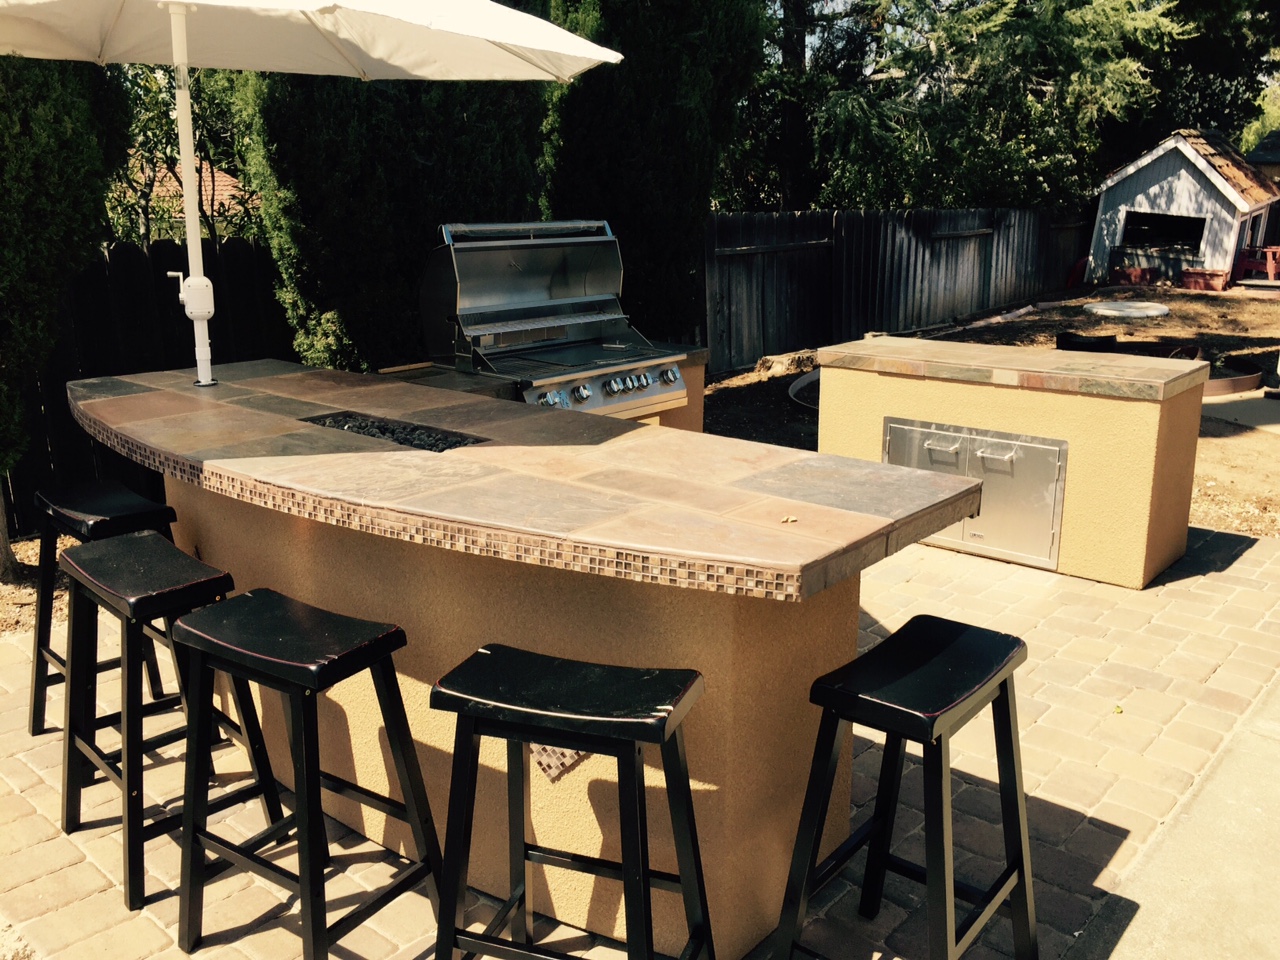
Here’s another view of the outdoor kitchen. Judging by the amount of stools in place it’s easy to see that there is ample seating space. The adjustable umbrella is also set into place in the island itself. There are also some wonderful tile details visible in this image as well. You can see the ridge has a mosaic style detail, adding that extra “wow” factor. There are also diamond shaped mosaics on the island itself that really bring the visual aspect to the next level. We are extremely proud of the quality of our products and craftsmanship and we know that it shows in these images. We hope that witnessing the step-by-step transformation of a backyard patio by way of adding one of our outdoor kitchens / BBQ islands was useful and enjoyable to see!
“I just picked up the L75000 grill from Lion. I had considered a few other options, but I decided on this one because it had comparable features to some of the much more expensive grills on the market. I was hesitant at first, but went with my gut and ordered it. What can I say, this grill is a beast! Blows my old gas grill out of the water. It is very well built and comes with a bunch of extras like the rotisserie, the warming rack, interior lights, push start ignition, griddle, cover and more. More important though is how does this thing grill? Perfectly. I’m able to get a nice sear when I need to on a steak and the rack is great for slow cooking. It looks great, when people come over they always remark on how nice it looks and are interested in actually watching me grill on this thing. Very nice job from Lion Premium Grills.”Lion Premium Grills
L75000 Gas BBQ Grill___________